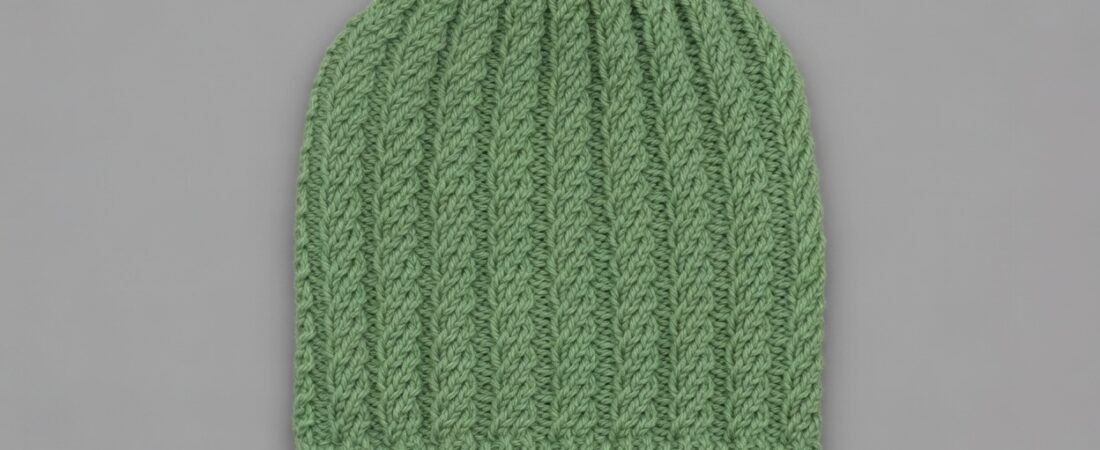
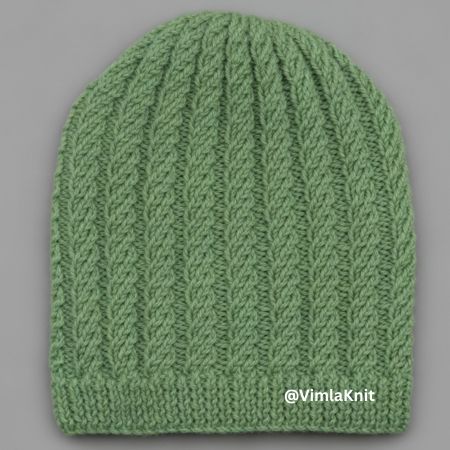
Hello knitters, I hope you’re all having fun knitting with me and knitting your own cozy beanies in this chilly weather. I’m so excited to welcome you to my blog with a brand-new and super pretty pattern – Beginner Spiral Cable Rib Beanie Knitting Pattern. This beanie is unisex, which makes it perfect for everyone in the family. You can knit one for yourself or make it as a sweet gift.
It’s worked flat on straight needles, so beginners find it much easier – just knit, seam it up, and you’re done! The stretchy ribbed brim gives a comfy fit on almost any head size. The beautiful spiral cable design adds a modern, trendy touch. If you choose a soft wool-blend yarn, it feels gentle on the skin with no irritation at all.
And the best part? If you’re trying cables for the first time, this pattern is made just for you. I explain every single step in the simplest way possible, with clear photos and helpful tips along the way.
Are you ready?
Then let’s get started and knit this Beginner Spiral Cable Rib Beanie together – easy, fun, and so rewarding!
Materials & Yarn Recommendations for the Spiral Cable Rib Beanie
1- 3.25 mm straight needle.
2- Vardhman Woolista Merino Wool Yarn (4 ply/stranded, 8 ply thickness, 100% pure merino wool, Yardage approx. 180-200 mtrs per 100gm ball).
3- Other optional tools are a tape measure, scissors, and yarn needle.
Abbreviations Used in This Pattern
SL: Slip Stitch/Stitches
K: Knit
P: Purl
STS: Stitches/Stitch
RS: Right Side
WS: Wrong Side
K2tog: Knit 2 stitches together
P2tog: Purl 2 stitches together
Special Stitch: ext-k2tog (extended k2tog)
Step1: k2tog
Step2: without slipping from left needle, knit 1st stitch again.
Step 3: slip both stitches off left needle.
How to Knit the Unisex Spiral Cable Rib Beanie Step by Step
Casting on: 115 sts for Spiral Cable Beanie with Vardhman Woolista Merino Wool Yarn/3.25 mm straight needle.
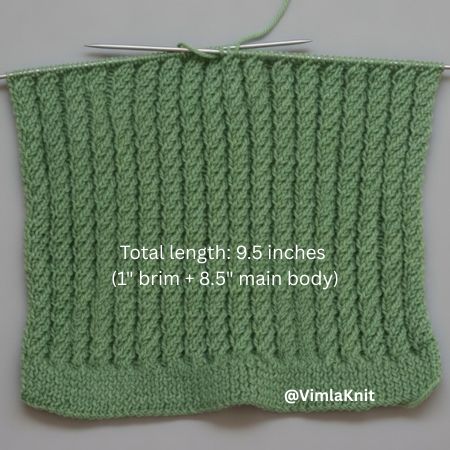
Finished Size & Fit: The finished unisex Spiral Cable Rib Beanie measures approximately 9.5 inches in total length, consisting of a 1-inch brim, a 8.5-inch main body & crown. Fits a head circumference of 22–23/23-24(Stretchable) inches (one size).
Skill Level: Intermediate/Beginner.
Pattern Language: English.
Techniques Used: Cast on 115 stitches to start. Work the ribbed brim until it reaches your desired length. Once the brim is done, switch to the main body: repeat the 4-row spiral cable rib stitch pattern until the piece measures the right length. Shape the crown, cut the yarn, and neatly sew the edges together to finish.
How to Knit the Stretchy Ribbed Brim (K1, P1 Rib Tutorial)
Now, we’re starting the Spiral Cable Rib Beanie with a nice, stretchy ribbed brim. This brim will be about 1 inch tall and super comfy.
Row 1(RS): * P1, K1 * repeat from * to * …………… last sts P1
Row 2(WS): SL1(P), * P1, K1 * repeat from * to * ………….. last 2 sts P2
Keep repeating Row 1 and Row 2 until the ribbed brim measures exactly 1 inch.
Row 11 (RS): SL1(P), Knit all sts ………… last sts P1
Knit the Spiral Cable Rib Stitch Pattern for the Beanie Body
Now let’s make the body of the beanie! This is the most exciting part – the spiral cable rib stitch pattern. With this stitch, your beanie will get that beautiful spiral cable design that looks so stylish and modern.
We’ll use a small 4-row repeat and keep doing it over and over. That’s what creates the lovely spiral effect step by step. Easy, fun, and the cables will start showing up beautifully as you go!
Row 1(WS): SL1(P), K1, * P4, K2 * repeat from * to * …………… last 5 sts P5
Row 2(RS): SL1(P), * (ext-k2tog) X 2 times, P2 * repeat from * to *
Row 3(WS): Same as row 1
Row 4(RS): SL1(P), * K1, ext-k2tog, K1, P2 * repeat from * to *
If you’re still finding the Spiral Cable Rib Stitch pattern a bit tricky or want to understand it even better, I’ve shared a really helpful video tutorial below for you.
This video shows the Spiral Cable Rib Stitches step by step – explained in a very easy and clear way, especially for beginners.
Video Tutorials Credits: Aabharcreations
Now keep repeating these 4 rows until the body reaches the right length. I’ve already knit a total of 9.5 inches (1-inch ribbed brim + 8.5 inches of the spiral cable rib design part).
How to Shape the Crown – Decrease Stitches for Spiral Cable Rib Beanie
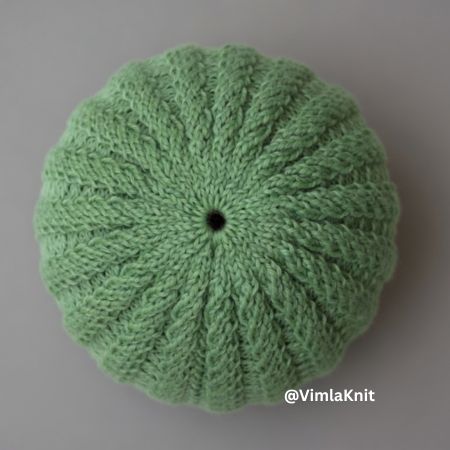
Now that the beanie has reached the full length, we’ll start decreasing the stitches. This will create a nice rounded shape at the top (the crown) and help the beanie close up beautifully.
This part is really easy – we’ll just reduce the stitches over a few rows so the top gently tapers and gathers. No need to worry at all – we’ll go step by step together!
Row 1(RS): P1, * K2tog, K2tog, P2 * repeat from * to *
Now I have 77 stitches remaining.
Row 2(WS): P1, K1, * P2, K2 * repeat from * to * ………….. last 3 sts P3
Row 3(RS): P1, * K2, P2tog * ……………..
Now I have 58 stitches remaining.
Row 4(WS): P1, * P2, K1 * repeat from * to * ………….. P3
Row 5(RS): P1, * K2tog, P1 * repeat from * to * ……………..
Now I have 39 stitches remaining.
Row 6(WS): P1, * P1, K1 * repeat from * to * ……….. last 2 sts P2
After the crown decreases, we’ll have 39 stitches left. This step is really easy – just thread these 39 stitches onto a yarn needle (or tapestry needle) with the yarn tail.
Then pull the yarn gently but firmly so the top closes completely and forms a small gather (like a little bunch). Secure it tightly – make a strong knot so it doesn’t come undone. Next, sew up the side of the beanie. Use mattress stitch or a simple back stitch to join the side seam neatly – this makes the stitching look clean and beautiful.
That’s it! Your Spiral Cable Rib Beanie is now completely finished. Try it on – see how cute, warm, and stylish it looks! If you have any questions or run into trouble with the seam, feel free to ask anytime.
Watch the video: How to Seam Both Sides of the Spiral Cable Rib Beanie Hat (Easy Step-by-Step).
Video reference for seaming both sides: The Sweater Collective
Your Spiral Cable Rib Beanie is Ready – Congratulations!
Your beanie is all done!
How did you like this Spiral Cable Rib Beanie Knitting Tutorial? Please tell me in the comments – I really love reading your feedback. Did you enjoy making the cables? Was any step tricky? Share everything!
I’ve shared many other easy beginner beanie knitting projects on my blog too. If you’re new to my website, please take a look – there are lots of free patterns, simple tutorials, and helpful tips waiting for you.
If you enjoyed this tutorial, please share it with as many people as possible – your friends, family groups, WhatsApp, Instagram, or Facebook. The more people learn together, the more fun knitting becomes!
Thank you so much for all the love. I can’t wait to see photos of your finished beanie in the comments or in our Facebook group.
See you in the next project. Happy knitting!
Frequently Asked Questions – Spiral Cable Rib Beanie Pattern
Is this Spiral Cable Rib Beanie really suitable for complete beginners?
Yes! This pattern is beginner-friendly. It uses only straight needles and simple stitches. I explain every step slowly with photos & videos.
Can I use circular needles instead of straight needles?
Yes, you can. If you prefer knitting in the round.
How do I make the beanie tighter or looser?
The ribbed brim is already very stretchy. For a tighter fit, cast on 8–10 fewer stitches (e.g., 105–107). For looser, add 8–10 more stitches.
Is the Spiral Cable Rib Beanie machine washable?
It depends on your yarn! Merino wool blends like Vardhman Woolista are usually hand-wash only. Check the yarn label – if superwash wool, it’s machine-safe on gentle cycle. Always air dry flat to keep the shape.
2 responses to “Free Spiral Cable Rib Beanie Knitting Pattern for Beginners – Straight Needles Step-by-Step Tutorial.”
-
Please show the right side of the mattress-stitch seam.
-
The right side of the image is similar to the design on my beanie. I’ll try to upload the picture soon.
-
Leave a Reply