
Hello friends, and welcome to Vimla Knit! Today I’m sharing an easy leaf beanie knitting pattern that is lovely to knit and even lovelier to wear.
This whole beanie is made with just knit and purl stitches. Small leaves are worked in between, which gives it a soft, textured look. It’s a free leaf beanie knitting pattern, so you can follow it step by step right here.
The entire beanie is worked in a leaf stitch pattern. I’ve shared every detail in this post, so you won’t feel lost at any point.
So pick up your favorite yarn (I used Vardhman Woolista) and your needles, and let’s start knitting this pretty fall beanie together!
What You Need for This Leaf Beanie
Vardhman Woolista Merino Wool Yarn (4 ply/stranded, 8 ply thickness, 100% pure merino wool, Yardage approx. 180-200 mtrs per 100gm ball).
Straight knitting needles (3.25 mm)
A tapestry/yarn needle for seaming
A tape measure
Scissors
Knitting Terms Used in This Pattern
SL: Slip Stitch/Stitches
K: Knit
P: Purl
STS: Stitches/Stitch
RS: Right Side
WS: Wrong Side
K2tog: Knit 2 stitches together
P2tog: Purl 2 stitches together
P3tog: purl 3 stitches together
SL2tog: Slip 2 stitches together
YB: Yarn in back
The leaves are the star of this leaf beanie knitting pattern, so I’ve written the leaf stitch as one short abbreviation. This keeps the pattern rows easy to read.
Leaf(L): K1 (7th loop), K1 (6th loop), K1 (5th loop), K1 (4th loop), K1 (3rd loop), K1 (2nd loop), K1 (1st loop), yarn in front, P1, All new seven sts over the purl sts one by one from last sts
Whenever you see L in the pattern, work the leaf stitch exactly as written above.
If you’re not sure how the leaf looks while you knit it, don’t worry. I’ve shared a video tutorial that shows it step by step. You can watch it in this post. Thanks to Knitting Design Pattern Idea for the tutorial.
A quick tip: Please follow the video for the leaf pattern only. For the rest of the beanie, including the brim, row counts, and crown shaping, follow the written pattern in this post. Following the whole video can be confusing.
About This Easy Leaf Beanie Knitting Pattern
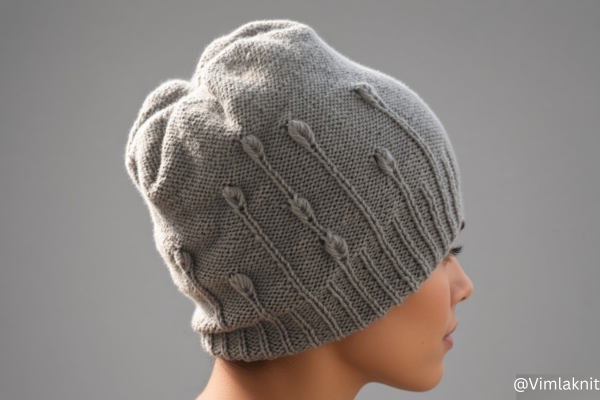
Casting On: Cast on 114 stitches using Vardhman Woolista Merino Wool Yarn and 3.25mm straight needles.
Finished Size & Fit: This unisex beanie measures approximately 8.5 inches in total length. It fits a 22 to 23 inch head circumference comfortably, so it’s a great one-size-fits-most option for adults.
Skill Level: Beginner to Intermediate
Pattern Language: English
Techniques Used: This leaf beanie knitting pattern uses only knit and purl stitches.
- Cast on 114 stitches and begin the brim with a (K1, P2) rib.
- Continue until the brim measures approximately 2.2 inches.
- Start the body with the leaf pattern and continue until the beanie measures approximately 8 inches in total length.
- Work the crown decreases.
- Cut the yarn, leaving a long tail. Thread the tail through the remaining stitches, pull tight to close the crown, and tie a firm knot.
- Sew the side seam neatly using the mattress stitch or your preferred seaming method.
How to Knit the Ribbed Brim
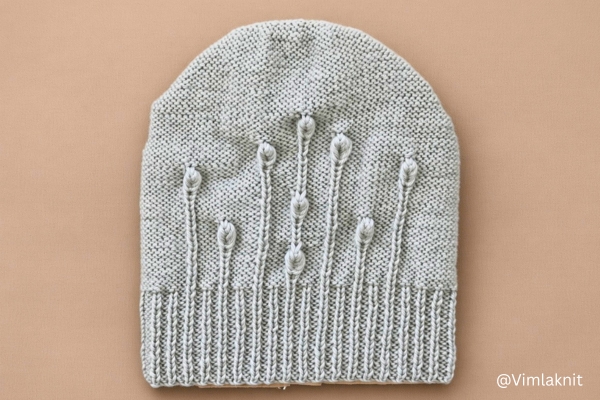
We will keep the same (K1, P2) rib from the brim. Some of these rib lines will continue straight up into the body of the beanie. These become the stems, and they look so lovely.
Row 1(RS): SL1 (P), * K1, P2 * repeat from * to * ………. last 2 sts K1, P1
Row 2(WS): SL1 (P), * P1, K2 * repeat from * to * ……………. last 2 sts P2
Repeat rows 1 and 2 until you reach row 20(approx. 2.2 inches).
Knitting the Leaf Stitch Pattern (Main Body)
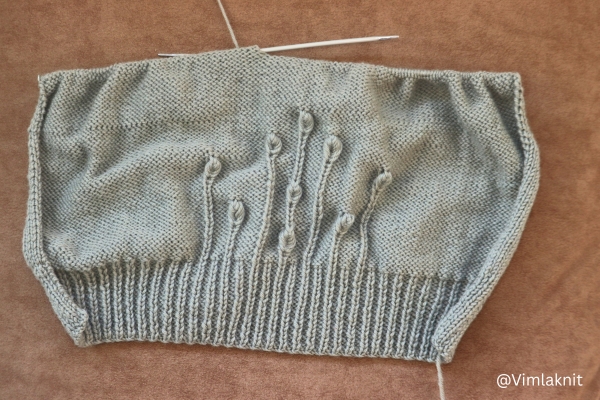
Once the brim is done, it’s time for the best part of this beanie: the leaf design. This is where the leaf beanie knitting pattern really comes to life.
The straight lines rising from the brim look like soft plant stems. At the top of each stem, a small knot-like bump forms, and it looks just like a leaf.
The stems and leaves stop at different heights. This gives the leaf pattern knit hat a natural, pretty look, almost like a little garden growing up your beanie.
To make the leaves stand out, the whole background is worked in stockinette stitch. This smooth, flat fabric lets the leaf stitch design show clearly.
So let’s start knitting the design part of our beanie. The pattern is given below.
Row 1(RS): P37, (K1, P5) 6 times, K1, P40
Row 2(WS): P1, K39, (P1, K5) 6 times, P1, K36, P1
Row 3(RS): Same as row 1
Row 4 WS): Same as row 2
Row 5(RS): Same as row 1
Row 6(WS): Same as row 2
Row 7(RS): Same as row 1
Row 8(WS): Same as row 2
Row 9(RS): P37, (K1, P5) 3 times, L , (P5, K1) 3 times, P40
Row 10(WS): Same as row 2
Row 11(RS): Same as row 1
Row 12(WS): Same as row 2
Row 13(RS): Same as row 1
Row 14(WS): Same as row 2
Row 15(RS): P37, K1, P5, L, (P5, K1) 3 times, P5, L, P5, K1, P40
Row 16(WS): P1, K39, P1, K11, (P1, K5) 2 times, P1, K11, P1, K36, P1
Row 17(RS): P37, K1, P11, (K1, P5) 2 times, K1, P11, K1, P40
Row 18(WS): Same as row 16
Row 19(RS): Same as row 17
Row 20(WS): Same as row 16
Row 21( RS): P37, L, P5, K1, P11, K1, P40
Row 22(WS): Same as row 16
Row 23(RS): Same as row 17
Row 24(WS): Same as row 16
Row 25(RS): Same as row 17
Row 26(WS): Same as row 16
Row 27(RS): P37, L, P11, (K1, P5) 2 times, K1, P11, L , P40
Row 28(WS): P1, K51, (P1, K5) 2 times, P1, K48, P1
Row 29(RS): P49, (K1, P5) 2 times, K1, P52
Row 30(WS): Same as row 28
Row 31(RS): Same as row 29
Row 32(WS): Same as row 28
Row 33(RS): P49, L, P5, K1, P5, L , P52
Row 34(WS): P1, K57, P1, K54, P1
Row 35(RS): P55, K1, P58
Row 36(WS): Same as row 34
Row 37(RS): Same as row 35
Row 38(WS): Same as row 34
Row 39(RS): P55, L, P58
Row 40(WS): P1, Knit all sts …………….. last sts P1
Row 41(RS): Purl all sts
Repeat rows 40 and 41 until the beanie reaches the length you want. I knitted mine to approx. 8 inches (including the brim).
Shaping the Crown of Your Leaf Beanie
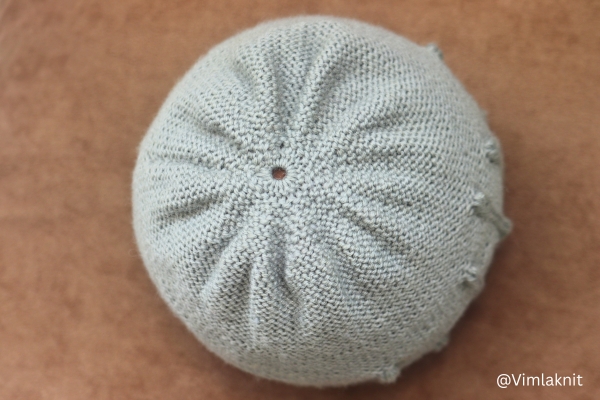
Once your beanie reaches the length you want, it’s time to shape the top. We do this by decreasing stitches a little at a time.
Please don’t close all the stitches at once. If you do, the top of your leaf beanie will turn out flat instead of round, and it won’t look nice.
In this part, we decrease stitches at regular spaces on every knit row (right side). The purl rows (wrong side) are worked plain, with no change.
This slowly pulls the stitches in as you go up. The result is a smooth, round crown that sits nicely on the head.
The full decrease pattern is given below.
Row 1(RS): P2, P2tog, * P4, P2tog * repeat from * to * ……….. last 2 sts P2
Now I have a total 95 stitches remaining.
Row 2(WS): P1, Knit all sts …………………. last sts P1
Row 3(RS): P1, P2tog, * P3, P2tog * repeat from * to * ……….. last 2 sts P2
Now I have a total 76 stitches remaining.
Row 4(WS): P1, Knit all sts ………….. last sts P1
Row 5(RS): P2tog, * P2, P2tog * repeat from * to * …………. last 2 sts P2
Now I have a total 57 stitches remaining.
Row 6(WS): P1, Knit all sts ………… last sts P1
Row 7(RS): P1, * P1, P2 tog * repeat from * to * ……….. last 2 sts P2
Now I have a total 39 stitches remaining.
Row 8(WS): P1, Knit all sts ……… last sts P1
Row 9(RS): P1, P2tog, P2tog, P2tog, …………………
Now I have a total 20 stitches remaining.
Row 10(WS): P1, Knit all sts …………. P1
After the decreases, you will have 20 stitches left on your needle. Now cut the yarn, leaving a long tail, and thread it through a yarn needle.
Slide the needle through all 20 stitches, pull tight, and tie a firm knot. Then sew the two edges of the beanie together neatly. When you finish sewing, trim any extra yarn.
Need help sewing your beanie? Watch video tutorial to see how to sew the side seam neatly with mattress stitch. It shows each step slowly, so you can follow along as you sew.
👉 Mattress Stitch to Sew Your Beanie
And that’s it! Your fall beanie is ready to wear.
Your Leaf Beanie Is Ready to Wear
And that’s our leaf beanie knitting pattern finished! I hope you enjoyed knitting it as much as I enjoyed making it. Watching the little leaves grow on those rib stems was my favorite part.
Did you like this free leaf beanie knitting pattern? Please tell me in the comments. Was any step confusing? Did you change anything to suit your yarn or head size? Your feedback helps me write better patterns, and it helps other knitters too.
If you knit this beanie, I would love to see it! Please share a photo on Instagram and tag me. Seeing your finished beanies always makes my day. 💛
If this is your first time on Vimla Knit, welcome! Please take a look around my website. I share many more free knitting patterns, and I’m sure you will find something you love.
That’s all for today. I’ll be back soon with a new project. Until then, take care and happy knitting!
FAQs About This Free Leaf Beanie Knitting Pattern
Is this leaf beanie knitting pattern free?
Yes, this is a free leaf beanie knitting pattern. You can follow the full written pattern in this post.
Is this beanie knitted on straight needles or in the round?
I knitted it on straight needles and sewed the side seam at the end. If you knit it in the round on circular needles, please share your notes in the comments. It will help other knitters who want to try it that way.
Is there a video for this pattern?
Yes, you can find the video tutorial in this post. It shows the main steps, including how to sew the seam.
Is this beanie good for beginners?
If you know how to knit and purl, you can make this beanie. The whole beanie is worked with just these two stitches. The leaf design needs some patience, so go slowly and read each row before you start.
Leave a Reply