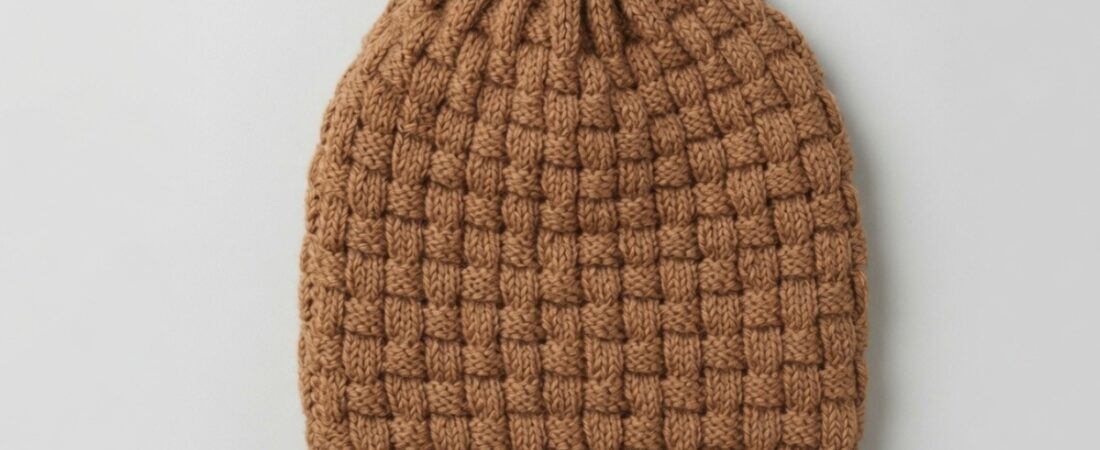
Hello friends, welcome to Vimla Knit! In every post, I try to explain knitting in the simplest way, so even beginners can follow along and finish their project on the first try.
Today I’m sharing a free basketweave knit beanie pattern with you. This basket weave beanie is easy to knit and looks trendy too. It suits everyone — kids, women, and men — so you can make it for the whole family.
This beginner-friendly basketweave knit beanie is made using straight needles. Once the knitting is done, you’ll sew up the side seam to finish the beanie hat.
I’ve broken this basketweave beanie pattern into 4 easy steps and explained each one in detail below. So grab your yarn and needles, and let’s knit this beautiful basket weave stitch hat together!
Yarn, Needles & Tools for This Easy Beanie Pattern
1- 3.25 mm straight needle.
2- Vardhman Woolista Merino Wool Yarn (4 ply/stranded, 8 ply thickness, 100% pure merino wool, Yardage approx. 180-200 mtrs per 100gm ball).
3- Other optional tools are a tape measure, scissors, and yarn needle.
Basic Abbreviations for This Beanie Hat Pattern
SL: Slip Stitch/Stitches
K: Knit
P: Purl
STS: Stitches/Stitch
RS: Right Side
WS: Wrong Side
K2tog: Knit 2 stitches together
P2tog: Purl 2 stitches together
SL2tog: Slip 2 stitches together
Basketweave Knit Beanie Pattern: Easy Guide with Rib Border and Crown Shaping
Casting On: Cast on 122 stitches using Vardhman Woolista Merino Wool Yarn and 3.25mm straight needles to begin this basketweave knit beanie pattern.
Finished Size & Fit: This beanie measures approximately 8.5 inches in total length and is designed for a loose, comfortable fit around a 24-inch head circumference, making it a great one-size-fits-most option for adults.
Skill Level: Beginner to Intermediate
Pattern Language: English
Techniques Used: Cast on 122 stitches and work in 2×2 rib (K2, P2) until the brim measures 1 inch, or your preferred length. Then switch to the basketweave stitch pattern and continue knitting until the total length reaches 8 inches (7 inches body + 1 inch brim). Once you’ve completed the crown shaping, cut the yarn leaving a long tail, and sew the edges together neatly using mattress stitch or your preferred seaming method to finish this beginner-friendly beanie.
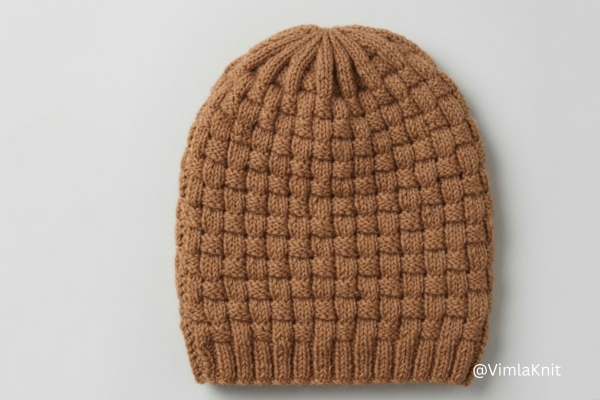
Easy Brim Pattern for Beginner Knitters
After casting on, we’ll start with the border to give the beanie a neat, finished look. For this basketweave knit beanie pattern, I’ve used a 2×2 rib stitch for the border. It looks lovely, and it’s just as easy to knit. This rib stitch also gives the beanie good stretch, so it fits the head perfectly.
Here’s the border pattern in detail: Border Pattern Instructions
Row 1 (RS): K2, P2 * repeat from * to * ………… last 2 sts K2
Row 2 (WS): P2, K2 * repeat from * to * ………….. last 2 sts P2
Repeat these 2 rows until you complete 9 rows, or about 1 inch.
Row 10: Purl all stitches
Step-by-Step Basketweave Design for This Beginner Knit Hat
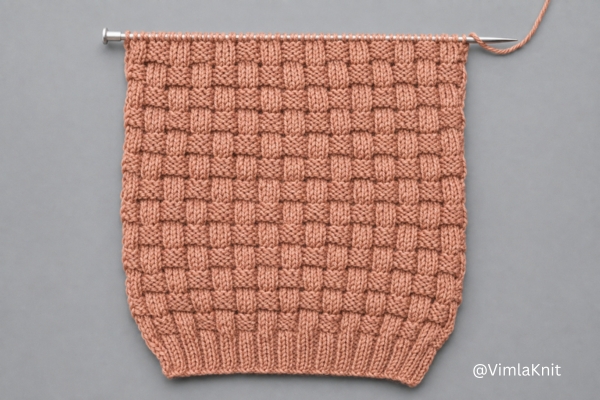
Once the brim is done, it’s time to knit the main part of the beanie.
This is where we add the basketweave stitch, the real highlight of this beanie hat pattern. I’ve paired it with a simple lace touch to make the basket weave design stand out even more.
This stitch looks just like a woven basket, with strips crossing over and under each other. It forms small square blocks across the knit, giving the fabric a raised, 3D texture.
This basketweave pattern repeats every 8 stitches and 12 rows. Below, I’ve explained step by step how to knit this pattern into your beanie.
Row 1: SL1, * K1, P5, K2 * repeat from * to * ………….. last sts K1
Row 2: SL1, * P2, K5, P1 * repeat from * to * ………… last sts P1
Row 3: Same as row 1
Row 4: Same as row 2
Row 5: SL1, * SSK, Yo, K3, Yo, K2tog, K1 * repeat from * to * ………….. last sts K1
Row 6: Purl all sts
Row 7: SL1, * P2, K3, P3 * repeat from * to * …………… last sts K1
Row 8: SL1, * K3, P3, K2 * repeat from * to * …………. last sts P1
Row 9: Same as row 7
Row 10: Same as row 8
Row 11: SL1, * K1, Yo, K2tog, K1, SSK, Yo, K2 * repeat from * to * …………….. last sts K1
Row 12: Purl all sts
Repeat rows 1 to 12 until you complete the full length of the beanie. I knit 6 full repeats plus 6 extra rows, which comes to about 9 inches in total (1 inch border + 8 inch design part).
Crown Shaping for This Basketweave Knit Hat
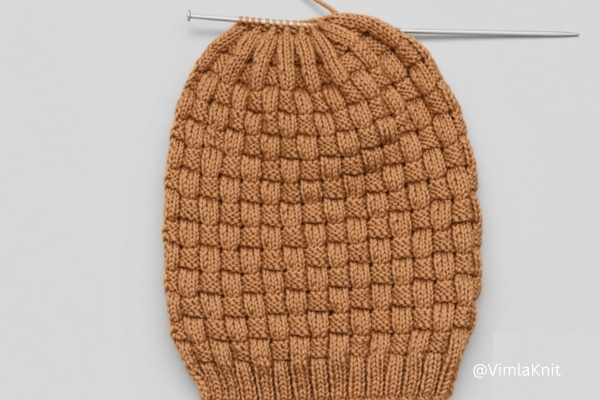
Once the beanie reaches the right length, the next step is decreasing the stitches properly. This is what gives the beanie its perfect shape and a neat, finished look.
For this basketweave knit hat pattern, we won’t decrease all the stitches at once. Instead, we’ll decrease them slowly, over several rows, so the beanie keeps its shape.
Here, we’ve decreased the stitches over 8 rows. While decreasing, we’ve also kept the basketweave design in mind, so the beanie’s shape and its pattern both turn out perfect.
The crown shaping pattern is explained in detail below —
Row 1 (RS): K2, * P2tog, P1, P2tog, K3 * repeat from * to *
Now I have 92 stitches left on the needle.
Row 2 (WS): * P3, K3 * repeat from * to * …………. last 2 sts P2
Row 3 (RS): K2, * P2tog, P1, K3 * repeat from * to *
Now I have 77 stitches left on the needle.
Row 4 (WS): * P3, K2 * repeat from * to * ………….. last 2 sts P2
Row 5 (RS): K2, * P2, K3 * repeat from * to *
Now I have 62 stitches left on the needle.
Row 6 (WS): * P3, K1 * repeat from * to * …………. last 2 sts P2
Row 7 (RS): K2tog, *P1, SL2tog (knitwise), K1, both slip sts over the knit sts* repeat from * to * ………………. last 3 sts K2tog, K1
Now I have 32 stitches left on the needle.
Row 8 (WS): P1, * P1, K1 * repeat from * to * ……. last sts P1
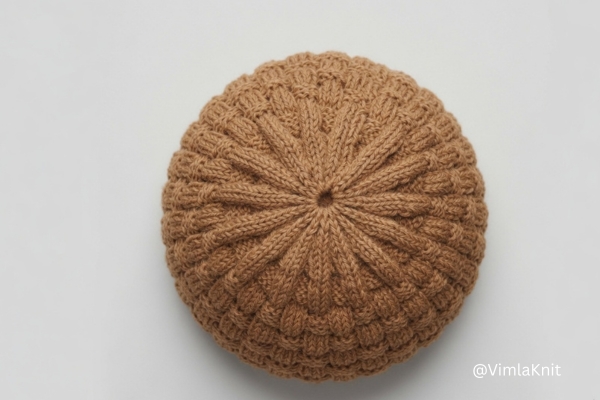
After decreasing, we’ll be left with 32 stitches. Now, cut the yarn a little long and thread it through a yarn needle. Slip all 32 remaining stitches onto the needle and pull tight to secure them.
Once the stitches are secure, bring both sides of the beanie together and sew along each edge using the needle. This step completes the basketweave knit hat pattern and gives it its final shape.
After sewing, cut off the extra yarn. Your beanie is now ready to wear!
Final Thoughts on This Basketweave Knit Hat Pattern
I really hope you loved this basketweave knit hat pattern. On my website, I’ve shared many more free knitting patterns for beanies and beanies, and readers have loved them so much. Many of you have knitted these beginner knit hat designs yourselves and sent me photos, and that means the world to me. Your love and support is my real strength, and I’m truly thankful to all of you for it.
If this is your first time on Vimla Knit, do check out my other easy beanie patterns and beanie designs too. I’m sure you’ll love those posts just as much as this basketweave hat pattern.
That’s all for today’s post. I’ll be back soon with another lovely knitting project. Until then, take care and stay happy. Bye-bye!
Check Out Our Other Free Beginner Beanie Patterns
Free Simple Unisex Beanie Pattern with Knit and Purl Stitches
Beginner-Friendly 1-Row Beanie Pattern
Simple Knit and Purl Beanie Pattern for Kids
Easy Checkerboard Beanie Pattern
Your Questions About This Knit Beanie Pattern, Answered
Is basketweave stitch hard to knit?
No, basketweave stitch is beginner-friendly. It only uses knit and purl stitches, so you don’t need any special skills to make it.
What is 2×2 rib stitch?
2×2 rib stitch means knitting 2 stitches and purling 2 stitches alternately, which creates a stretchy texture.
Can I make the border longer?
Yes, you can knit extra rows of rib stitch if you prefer a longer, folded brim.
Can I resize the basketweave pattern for a bigger or smaller head?
Yes, you can adjust the number of stitches, keeping it a multiple of 8 for the pattern to work.
Leave a Reply