Hey friends, Welcome everyone to Vimlaknit. In today’s post, I’m sharing a super fun and unique Free Brain Hat Knitting Pattern with you all.
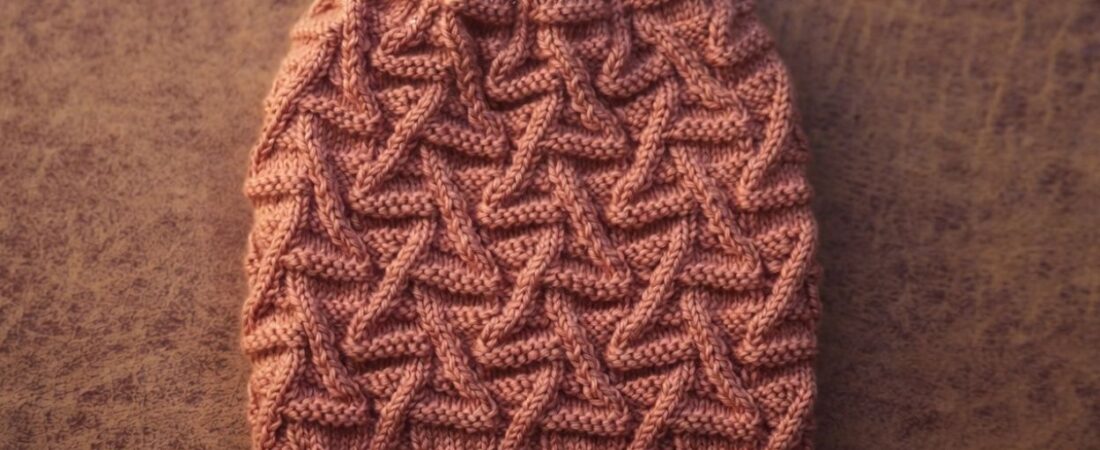
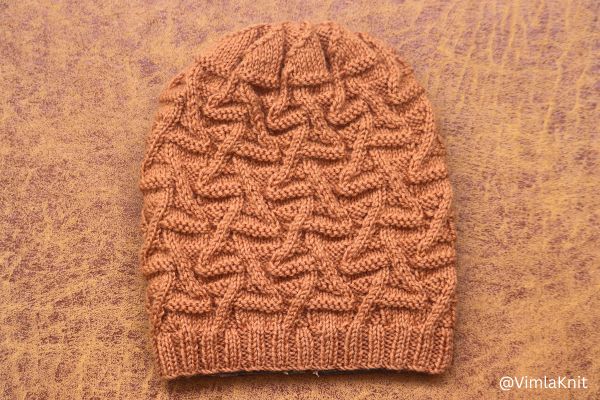
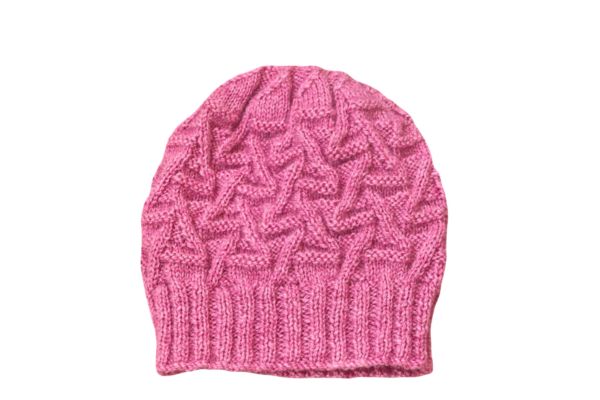
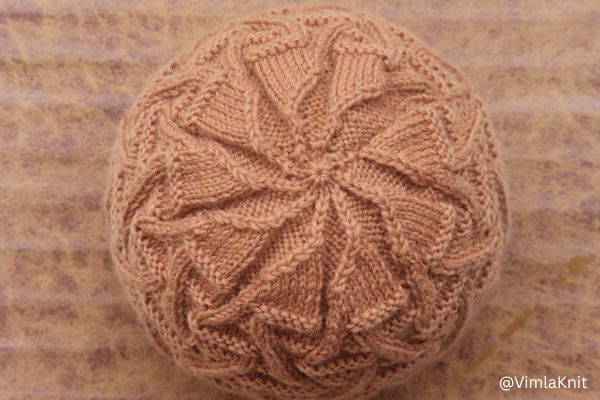
This pattern uses twisted stitches. Once it’s finished, the hat looks just like a brain, that’s why it’s called a Brain Hat. This Brain Hat Knitting Pattern is meant for advanced knitters who can easily twist stitches. But I’ve explained everything in very simple and easy steps in this post, so even beginners can make it without any trouble.
The Brain Hat is made completely with straight needles (single pointed needles). This pattern is finished in just 5 easy steps. I’ve explained each step in very simple language — short, clear, and straightforward — so that even beginners and slightly experienced knitters can make it easily without any confusion.
So what are we waiting for? Let’s start making the Brain Hat right now!
Supplies Needed for the Brain Hat
1- 3.25 mm straight needle.
2- Vardhman Woolista Merino Wool Yarn (4 ply/stranded, 8 ply thickness, 100% pure merino wool, Yardage approx. 180-200 mtrs per 100gm ball).
3- Other optional tools are a tape measure, scissors, and yarn needle.
Abbreviations and Terms
SL: Slip Stitch/Stitches
K: Knit
P: Purl
STS: Stitches/Stitch
RS: Right Side
WS: Wrong Side
K2tog: Knit 2 stitches together
P2tog: Purl 2 stitches together
T3F: 1 sts on cable needle & hold in back, K2, K1 from cable needle
T3B: 2 sts on cable needle & hold in front, K1, K2 from cable needle
Brain Beanie Knitting Pattern Step by Step
Casting on: 110 sts for brain hat with Vardhman Woolista Merino Wool Yarn/3.25 mm straight needle.
Finished Size & Fit: The finished unisex brain hat features twisted stitches and measures about 9 inches in total length: a 1-inch ribbed brim, 6 inches of patterned body, and a 2-inch crown. It fits head sizes 22–24 inches and is a true one-size-fits-most adult hat
Skill Level: Advance/Intermediate.
Pattern Language: English.
Techniques Used: Cast on 110 stitches. Work in 2×2 rib (K2, P2) for the brim until it measures 1 inch (or your desired length). On the next wrong-side row, increase to the required stitch count for the main pattern. Switch to the twisted stitch brain pattern and continue until the piece measures 7 inches from the cast-on edge (1 inch brim + 6 inches of pattern), ending after completing 3.5 full pattern repeats. Shape the crown, then cut the yarn leaving a long tail. Seam the back edges together neatly to finish the hat.
Easy Brim Tutorial for Brain Hat Knitting Pattern on Straight Needles
After casting on, the first thing we’ll make in the Brain Hat is the brim. I’ve used 2×2 rib stitch for this pattern because it gives the hat a nice look and good stretch. I’ve kept the brim a bit short so the hat looks modern and feels comfortable. You can make the brim shorter or longer depending on what you like.
Row 1 (RS ): * K2, P2 * repeat from * to * till the end of the row
Row 2 ( WS): Knit in knit & Purl in purl
Repeat these lines until you have completed a 1-inch border. Right now, I’ve already knitted 9 rows.
Note: If you knit a 2-inch brim and then complete 2.5 repeats of the pattern (50 rows total in the main body).
How to Increasing Stitches for Brain Hat
After finishing the brim, now we’ll increase the stitches. We need to increase 20 stitches from the back side. For this, I’ve knitted the entire row purlwise (that means you purl every stitch).
You can use any method you like to increase the stitches, whichever feels easiest for you. Just make sure to spread the increases evenly across the row. This way the hat stays nice and even all around. If you add too many in one spot and too few in another, the shape can look uneven.
Row 10(WS): *P5, increase 1 sts* repeat from * to *………….last 4 sts P4
After increasing the stitches, we now have a total of 130 stitches.
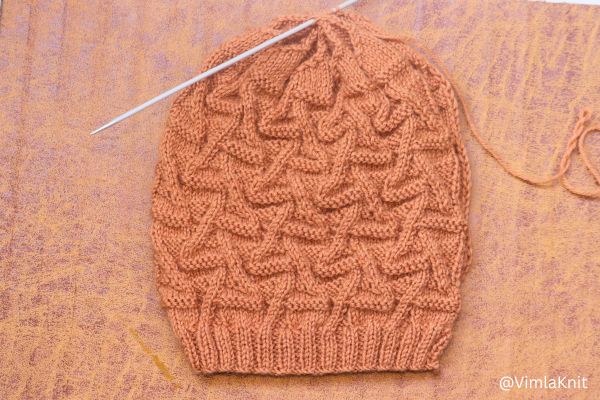
Knitting the Main Body of the Brain Hat
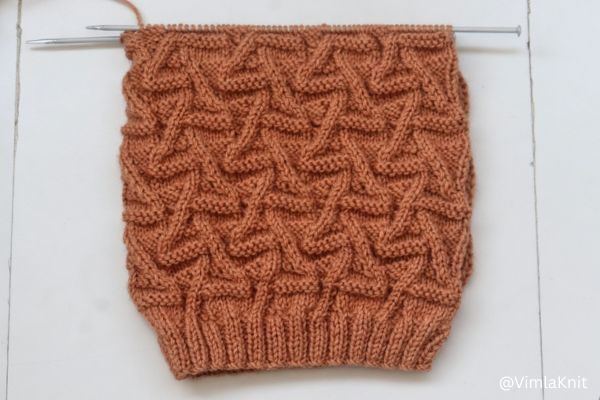
Now we’ll start the real design from the right side. This is the most fun part of the Brain Hat! This pattern is made with twisted stitches, which give the hat that wrinkled, brain-like look. The pattern repeat is 20 rows and 14 stitches. Once this part is done, your Brain Hat will really start looking like a brain.
Note: Total 130 stitches (multiple of 14 stitches + 4 extra edge stitches).
Row 1(RS): SL1, K1, * K7, P4, T3F * repeat from * to * …………. last 2 sts K2
Row 2(WS): Knit in knit & Purl in purl (All wrong side apply same rule) SL1, P1, * K1, P2, K4, P7 * repeat from * to * ……………. last 2 sts P2
Row 3(RS): SL1, K1, * K7, P3, T3F, P1 * repeat from * to * ………….. last 2 sts K2
Row 4(WS): SL1, P1, * K2, P2, K3, P7 * repeat from * to * …………. last 2 sts P2
Row 5(RS): SL1, K1, * P9, T3F, P2 * repeat from * to * ……………. last 2 sts K2
Row 6(WS): SL1, P1, * K3, P2, K9 * repeat from * to * …………… last 2 sts P2
Row 7(RS): SL1, K1, * K7, P1, T3F, P3 * repeat from * to * …………. last 2 sts K2
Row 8(WS): SL1, P1, * K4, P2, K1, P7 * repeat from * to * ………….. last 2 sts P2
Row 9(RS): SL1, K1, * K7, T3F, P4 * repeat from * to * …………….. last 2 sts K2
Row 10(WS): SL1, P1, * K5, P9 * repeat from * to * …………. last 2 sts P2
Row 11(RS): SL1, K1, * T3B, P4, K7 * repeat from * to * ……………. last 2 sts K2
Row 12(WS): SL1, P1, * P7, K4, P2, K1 * repeat from * to * ………….. last 2 sts P2
Row 13(RS): SL1, K1, * P1, T3B, P3, K7 * repeat from * to * ………… last 2 sts K2
Row 14(WS): SL1, P1, * P7, K3, P2, K2 * repeat from * to * ………….. last 2 sts P2
Row 15(RS): SL1, K1, * P2, T3B, P9 * repeat from * to * ……………… last 2 sts K2
Row 16(WS): SL1, P1, * K9, P2, K3 * repeat from * to * …………… last 2 sts P2
Row 17(RS): SL1, K1, * P3, T3B, P1, K7 * repeat from * to * ……….. last 2 sts K2
Row 18(WS): SL1, P1, * P7, K1, P2, K4 * repeat from * to * ………….. last 2 sts P2
Row 19(RS): SL1, K1, * P4, T3B, K7 * repeat from * to * ……… last 2 sts K2
Row 20(WS): SL1, P1, * P9, K5 * repeat from * to * ……………… last 2 sts P2
Repeat Rows 1 to 20 until the hat reaches about 7 inches in total length (1 inch border + 6 inches of the main twisted stitch design). I have currently knit 3 full repeats plus half a repeat, which measures approximately 7 inches.
Easy Crown Shaping for Brain Hat – Step by Step
Once the hat reaches the right length, you can start decreasing the stitches. The full decreasing pattern for the crown is given below.
Row 1 (RS): K2tog, * K7, K2tog, P5 * repeat from * to * ………….. last 2 sts K2tog
Now 119 sts remaining.
Row 2 (WS): SL1, * K5, P2tog, P6 * repeat from * to * ………….. last sts P1
Now 110 sts remaining.
Row 3 (RS): SL1, * K5, K2tog, P5 * repeat from * to * ……………… last sts K1
Now 101 sts remaining.
Row 4 (WS): SL1, * K5, P2tog, P4 * repeat from * to * ……………. last sts P1
Now 92 sts remaining.
Row 5 (RS): SL1, * K3, K2tog, P5 * repeat from * to * …………… last sts K1
Now 83 sts remaining.
Row 6 (WS): SL1, * K5, P2tog, P2 * repeat from * to * …………… last sts P1
Now 74 sts remaining.
Row 7 (RS): SL1, * K1, K2tog, P5 * repeat from * to * ……………. last sts K1
Now 65 sts remaining.
Row 8 (WS): SL1, * K5, P2tog * repeat from * to * ……………… last sts P1
Now 56 sts remaining.
Row 9 (RS): SL1, K1, * P4, K2tog * repeat from * to *
Now 47 sts remaining.
Row 10 (WS): * P2tog, K3 * repeat from * to * ………… last 2 sts P2
Now 38 sts remaining.
Row 11 (RS): SL1, K1, * P2, K2tog * repeat from * to *
Now 29 sts remaining.
Row 12 (WS): * P2tog, K1 * repeate from * to * ……………. last 2 sts P2
Now 20 sts remaining.
Row 13 (RS): K2tog, K2tog, K2tog ………………
Now 10 sts remaining.
Row 14 (WS): Purl all sts
After the crown decreases, you’ll be left with just 10 stitches. Thread those 10 stitches onto a yarn needle (or tapestry needle) using the yarn tail. Then gently but firmly pull the yarn to close the top completely. It will gather nicely into a small bunch at the crown. Tighten it well and tie a strong knot so it stays secure.
Next, sew up the side seam of the hat. You can use mattress stitch or a simple backstitch — it gives a clean and neat finish.
And that’s it! Your brain hat is now all done and ready to wear.
The Brain Hat Experience: Final Remarks
I really hope you loved our Brain Hat knitting pattern. If you have any questions or get stuck anywhere, feel free to ask in the comments. We’ll try our best to reply as soon as possible.
We also share many simple and beautiful beanie knitting patterns suitable for both beginners and intermediate knitters. These patterns are so lovely and easy that you’ll feel like starting them right away. I’m sure you’re going to enjoy them a lot and have so much fun knitting!
Common Questions About the Brain Hat Pattern
Is this Brain Hat pattern really suitable for beginners?
Yes! Even though it says “advanced/intermediate” because of the twisted stitches, I have explained every single step in very easy language. Beginners can easily follow it.
Is the Brain Hat unisex?
Yes, it is a unisex beanie. It looks great on both men and women.
Can I make the brim longer or shorter?
Absolutely! Just keep repeating the 2×2 rib until you reach your desired length. I kept it short for a modern look, but you can make it longer if you like.
How do I sew the side seam?
I recommend the mattress stitch for an invisible join.