Hello dear knitters and knitting lovers, Welcome to Vimla Knit! Today I’m super excited to share a lovely and incredibly easy Women’s Simple Beanie Knitting Pattern with you all. In this blog post, I’ve brought a super simple beanie for women that’s made with basic knit and purl stitches using straight needles.
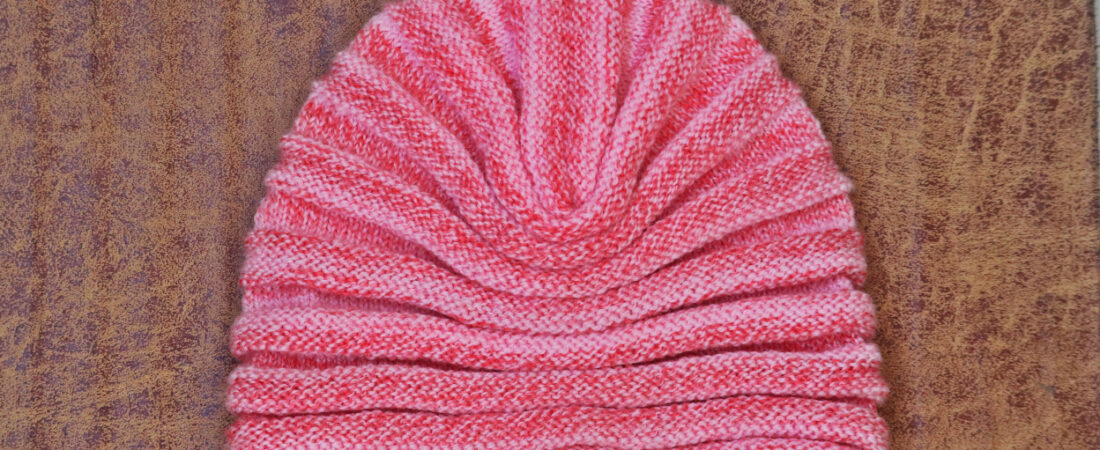
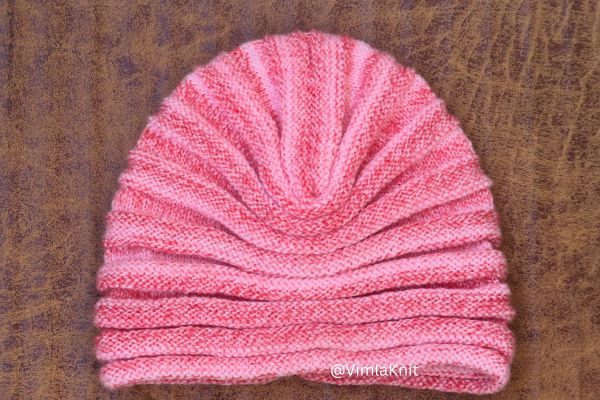
This beanie is truly beginner-friendly and a joy to knit. The best part? You can seam it in different ways to give it a fresh new look every time. You don’t need to knit a separate brim — the entire beanie is worked in the same pattern from start to finish. It creates a beautiful raised texture and looks equally pretty on both sides, making it a true reversible beanie.
Since all the stitches are bound off together, there’s no separate brim pattern or fancy bind-off required. That’s why it’s the perfect simple beginner beanie!
So, let’s get started. Come along with me as I show you step-by-step exactly how to knit this Women’s Simple Beanie Knitting Pattern.
Materials Needed for Women’s Simple Beanie
1- 3.25 mm straight needle.
2- Vardhman Zig Zag Wool Yarn (2 toned colour, Yardage approx 250-275mtrs per 100gms, Reverse 4ply, & Blend: 88% Acrylic / 12% Nylon).
3- Other optional tools are a tape measure, scissors, and yarn needle.
Common Knitting Abbreviations
SL: Slip Stitch/Stitches
K: Knit
P: Purl
STS: Stitches/Stitch
RS: Right Side
WS: Wrong Side
Beginner-Friendly Women’s Simple Beanie Knitting Pattern
Casting on: 120 sts for women hat with Vardhman Zig Zag Wool Yarn /3.25 mm straight needle.
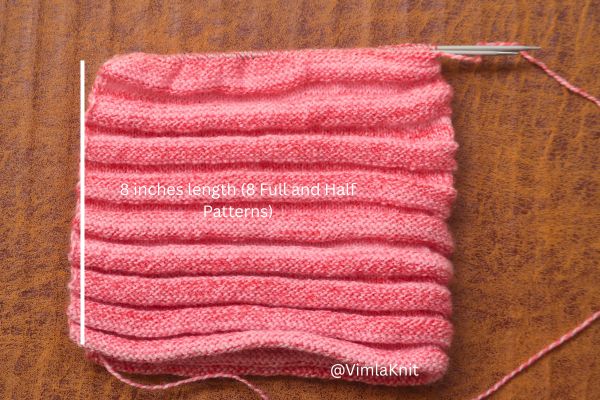
Finished Size & Fit: The total length measures approximately 8 inches. It is designed to fit head circumferences between 22 and 24 inches, making it a one-size-fits-most adult hat.
Skill Level: Beginner.
Pattern Language: English.
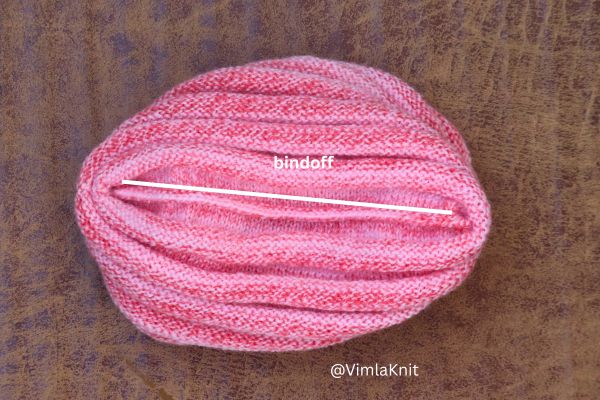
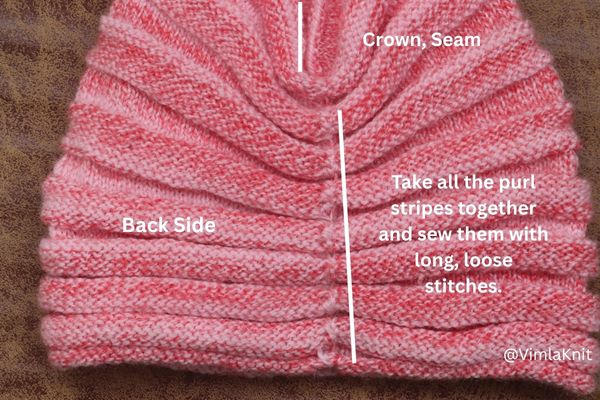
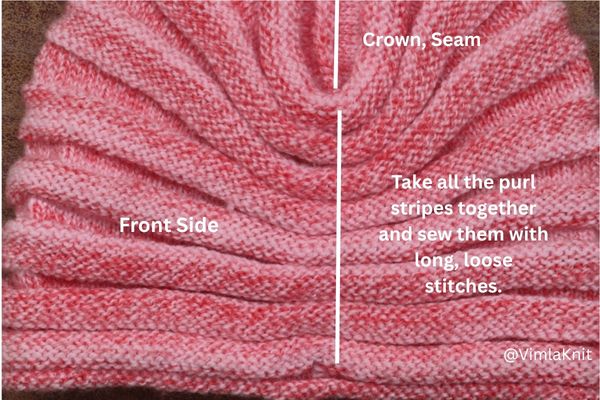
Techniques Used: Cast on 120 stitches and follow the pattern until the total length measures approximately 8 inches. Complete the crown shaping, then cut the yarn, leaving a long tail for sewing. Neatly sew the edges together using a mattress stitch or your preferred seaming method to finish the beanie. For the final touch, gather all the purl stripes together and sew them with long, loose stitches. This will join all the stripes neatly without any gaps, creating a beautiful raised effect and giving the beanie a stylish look.
After casting on, please follow the beanie pattern below.
Row 1 (RS): Purl all sts
Row 2 (WS): Knit all sts
Row 3 (RS): Purl all sts
Row 4 (WS): Knit all sts
Row 5 (RS): Purl all sts
Row 6 (WS): Knit all sts
Row 7 (RS): Purl all sts
Row 8 (WS): Knit all sts
Row 9 (RS): Knit all sts
Row 10 (WS): Purl all sts
Row 11 (RS): Knit all sts
Row 12 (WS): Purl all sts
Row 13 (RS): Knit all sts
Row 14 (WS): Purl all sts
Row 15 (RS): Knit all sts
Row 16 (WS): Purl all sts
Repeat Rows 1 to 16 until the desired length of the beanie is completed. I knitted 8 full pattern repeats and one half repeat, which measures approximately 8 inches (9 purl stripes visible from the right side).
Women’s Simple Beanie Knitting Pattern – Size & Length Details
When measuring your beanie, never stretch the knitting to check the size. This pattern is quite stretchable, so pulling it can give you an incorrect measurement.
For this Women’s Simple Beanie Knitting Pattern, the total length should be 8 inches only. I have repeated the full pattern 8 times (16 rows each) and then added 8 rows. If you count the purl stripes from the right side, you will see 9 beautiful purl stripes.
Women’s Simple Beanie Crown Shaping Instructions
In this beanie, all stitches are decreased together at the top. I’ve used a simple yet strong technique that gives a neat finish
1- First, knit 60 stitches (half of the total stitches).
2- Once you have half the stitches on each needle, fold the beanie so that the back side is facing you.
3- Now, using a third needle, we will start decreasing the stitches. Pick up one stitch from the front needle and one stitch from the back needle, then knit them together.
4- Repeat step 3 once again. now 2 stitches on the right needle, lift the back stitch over the front stitch. This will decrease one stitch. Now you’ll be left with just one stitch on the right needle.
Continue repeating step 3 & 4 until all the remaining stitches are decreased.
Simple Side Seam Method for Beanie:
If you seam the beanie normally from the side, it will give you a classic and simple beanie look.
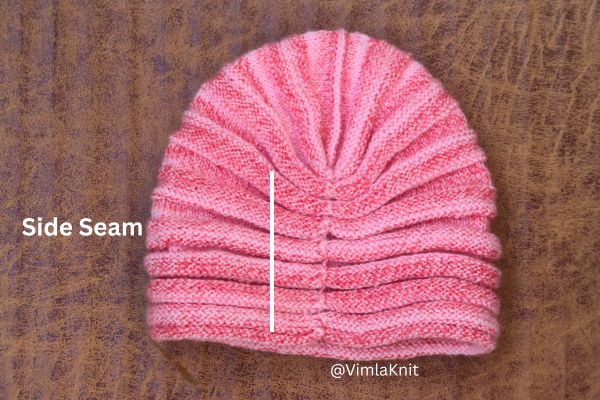
To make your beanie look even more stylish and trendy, take all the purl stripes together and sew them with long, loose stitches. This will join all the stripes neatly without any gaps, giving a beautiful raised effect. You need to do this process on both the front and back sides of the beanie. Make sure to do it especially on the side where you have made the seam. With this special seaming method, even a simple beanie gets a very attractive and fashionable look. So, what do you think?
Simple Women’s Beanie Pattern – Conclusion & Tips
This Women’s Simple Beanie Knitting Pattern is extremely easy and amazing to make. You can also experiment with different seaming styles to give your beanie a completely unique and stylish appearance every time. I hope you enjoyed this pattern and will definitely try making it once.
If you face any problem while knitting this beanie or have any feedback, feel free to leave a comment below. I always reply as soon as possible. I have also shared many other easy beanie patterns for beginners — you can try those too! I’ll end this simple beanie tutorial here.
See you soon with a new easy and simple beanie tutorial.
Happy Knitting!
FAQs – Women’s Simple Beanie Knitting Pattern
Is this Women’s Simple Beanie Knitting Pattern beginner-friendly?
Yes, this pattern is perfect for beginners because it uses only basic knit and purl stitches.
How long should the beanie measure?
The total length should measure approximately 8 inches.
Is this beanie stretchable?
Yes, this beanie has a very stretchable texture.
What skill level is required for this pattern?
This is an easy beginner-level knitting pattern.
Leave a Reply