Beginner-Friendly Cable Beanie Pattern Using Straight Knitting Needles | Complete Step-by-Step Pattern.
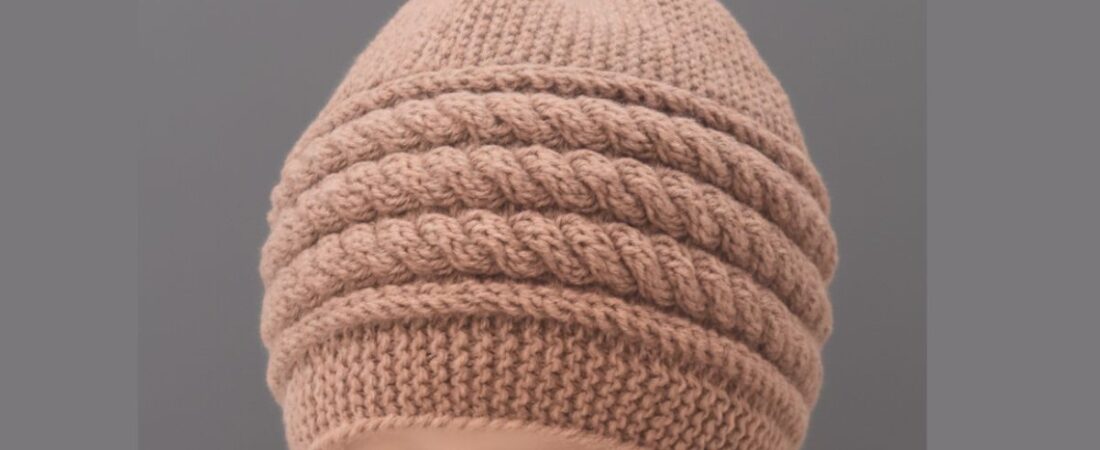
Hello knitters! Welcome to my new cable beanie knitting blog. In today’s tutorial, we’re exploring a beautifully designed beanie that is knitted in a completely unique way.
This easy beanie knitting pattern features a stunning cable design, and the entire hat is worked in one go. I have knitted this beanie using straight needles, and you can choose the needle size based on the yarn you are using.
This beanie is made using a unique method, which means you don’t need to knit a separate brim, and there is no need to shape the beanie afterward.
In this beanie, we will knit the brim, the cable pattern, and the bind-off all together in one continuous process. We will be knitting this beanie in two simple parts.
In the first part, we will knit the beanie, and in the second part, we will sew it together to complete the shape. So let’s begin learning the Cable Beanie Pattern using Straight Needles.
Yarn & Needle Requirements for Cable Beanie Knitting
1- 3.25 mm straight needle
2- Vardhman Woolista Merino Wool Yarn (4 ply/stranded, 8 ply thickness, 100% pure merino wool, Yardage approx. 180-200 mtrs per 100gm ball).
3- Other optional tools are a tape measure, cable needle, scissors, and yarn needle.
Knitting Abbreviations Used in This Cable Beanie Pattern
C6B: Cable 6 Back
T2B: Twist 2 Back
SL: Slip Stitch/Stitches
K: Knit
P: Purl
STS: Stitches/Stitch
RS: Right Side
WS: Wrong Side
Essential Tips & Special Notes to Knit Cable Beanie Pattern
A key point to remember is that the number of stitches you cast on should match the length you want for your beanie. So, if you prefer a slouchy beanie, simply cast on more stitches.
For this tutorial, I’m knitting a classic, fitted cable beanie.
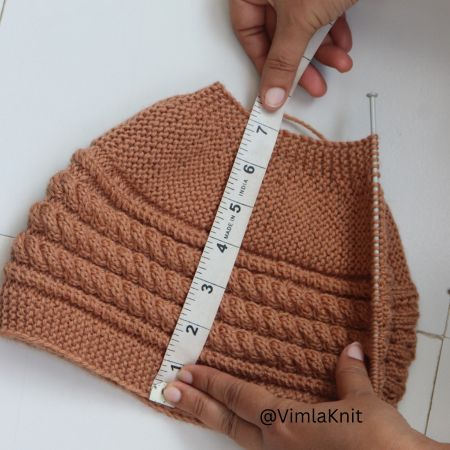
Another important point to remember is how to measure the correct length of your beanie. Always fold the beanie in half and then match that measurement to the head circumference.
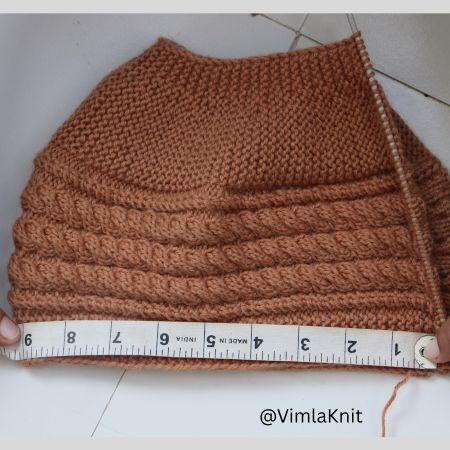
For example, if the head size is 23 inches, your folded beanie should measure 9 inches. This ensures a perfect, comfortable fit for your knitted cable beanie.
When you knit this beanie, you will notice that one side appears longer while the other side looks shorter. The shorter section will form the crown of your beanie, giving it the perfect shape and fit.

Up next, I’ll guide you through a detailed, step-by-step tutorial on how to knit this beanie.
Cable Beanie Knitting Instructions Using Straight Needles (Beginner-Friendly)
Cast on: 60 sts (with Vardhman Woolista 100% Merino Wool Yarn Knitting/3.25 mm straight needle).
Sizes Available: Unisex fitted cable beanie, fits a 23–24 inch head circumference. Finished length is approximately 7 inches.
Skill Level: Intermediate/Beginner.
Pattern Language: English.
Techniques Used: Cast on 60 stitches and repeat the 8-row cable pattern. Knit until the beanie reaches your desired length, then secure the yarn and neatly sew the edges together to finish the hat.
How to Knit a Fitted Cable Beanie – Free Pattern Guide
Row 1: P9, T2B, ( P2, K6 ) 3 times, P2, T2B, P20, K1
Row 2: P19, K2, P2, ( K2, P6 ) 3 times, K2, P2, K2, P6, K1
Row 3: P9, T2B, ( P2, C6B ) 3 times, P2, T2B, P15 left 6 sts and turn the work
Row 4: P13, K2, P2, ( K2, P6 ) 3 times, K2, P2, K2, P6, K1
Row 5: Same as row 1
Row 6: Same as row 2
Row 7: P9, T2B, ( P2, C6B ) 3 times, P2, T2B, P13 left 8 sts then turn the work
Row 8: P11, K2, P2, ( K2, P6 ) 3 times, K2, P2, K2, P6, K1
Repeat these 8 rows until you complete the full length of the beanie.
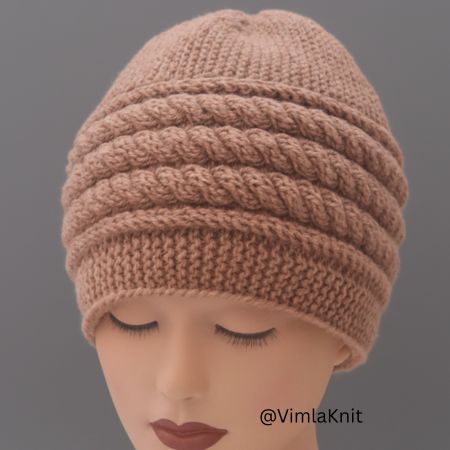
When the beanie reaches the full desired length, sew it along the crown and the side. Make sure to remember that the side where we slipped a few stitches while knitting will form the crown of the beanie.
The beanie is now ready to wear, and the best part is that this cable beanie pattern knits up very quickly.
Wrapping Up Your Cable Beanie Knitting Journey
I truly hope you enjoyed this cable beanie pattern tutorial and found each step easy to follow. This design is perfect for beginners who want to learn cable knitting on straight needles, and it works up quickly, making it a great project for all skill levels. Your feedback means a lot to me, so please feel free to share your thoughts, suggestions, or even your finished beanie photos.
If you loved making this beanie, you will definitely enjoy exploring the other beginner-friendly beanie patterns shared on my blog. Each pattern is designed with simplicity, clarity, and comfort in mind—so whether you’re knitting for yourself or gifting someone special, you’ll always find something inspiring and easy to make.
Keep practicing, keep knitting, and keep enjoying your knitting journey! I’m excited to see what you’ll make next. Happy knitting!
Straight Needle Cable Beanie Pattern – Frequently Asked Questions
Do I need to knit a separate brim?
No. In this pattern, the brim, cable design, and bind-off are all knitted in one continuous process, so no separate brim is needed.
How do I make the beanie slouchy?
Simply cast on more stitches to increase the overall length.
How many stitches should I cast on for a standard adult beanie?
You can cast on 60 stitches for an average adult size.
Can I add a pom-pom on top?
Definitely! A pom-pom adds a fun finishing touch to the cable beanie.
8 responses to “Straight Needle Cable Beanie Pattern – Easy, Quick & Free Beanie Knitting Tutorial.”
-
the only instructions here are for the middle part of the hat!!! What about the tapering top and the brim?? Where are the rest of the instructions?!?!?!
-
There is no crown shaping. We have to knit the hat from top to bottom as per the shared pattern. In the end, we only need to sew it. There is no border and no decreasing.
-
-
How do you do the T2B
-
the first row of instructions only has 40 stitches. 60 stitches cast on. what do you do with the remaining 20 stitches? All the other rows account for all 60 stitches cast on
-
Hi Martha, thank you for your comments. The necessary correction has been done. Row 1: P9, T2B, ( P2, K6 ) 3 times, P2, T2B, P20, K1
-
-
You will be working the next two stitches off the left needle. This is how.
Knit the second from the left stitch on the left needle
Leave it on the needle (do not lift off)
Move the yarn to the front
Purl the first stitch, which has been twisted to the second positionWhen you purl, the stitches are both on the right needle, so you just complete the purl as a normal purl action.
What this does is creates a slanted stitch, much like if you put the first stitch on a cable needle, moved to the back, knit the next stitch, then did the purl. It’s just doing a one stitch cable to the right.
-
What do you mean by “left 6 stitches” on row three?
-
HI Denise,
I hope it will help you.
Easy Explanation 🧶
Knit the stitches as the pattern says.
When 6 stitches are still left on the needle, stop knitting.
Do not knit those 6 stitches.
Turn your knitting (change the side you are working on).
Start knitting back in the opposite direction.
-
Leave a Reply to Vimla Negi Cancel reply