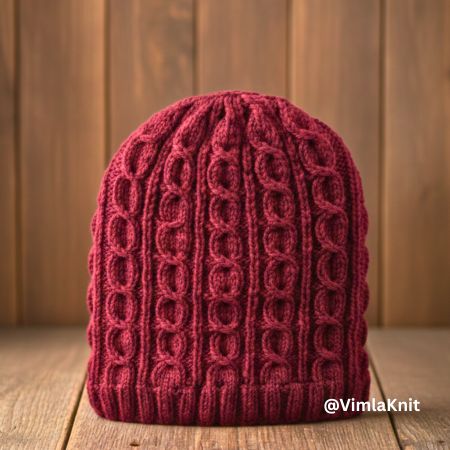
Hello knitters, welcome to my blog! Today I’m sharing a free winter twisted beanie knitting pattern that is easy and beginner friendly. This unisex twisted beanie can be knitted for any age using simple straight needles. It’s a cozy winter beanie design, perfect for everyday wear or handmade gifts.
A step-by-step knitting tutorial is shared to show how to make this winter twisted beanie. Let’s start knitting this easy unisex twisted beanie.
Supplies Needed to Knit a Winter Twisted Beanie
1- 3.25 mm straight needle.
2- Vardhman Woolista Merino Wool Yarn (4 ply/stranded, 8 ply thickness, 100% pure merino wool, Yardage approx. 180-200 mtrs per 100gm ball).
3- Other optional tools are a tape measure, cable needle, scissors, and yarn needle.
Knitting Terms and Abbreviations Explained
Before you begin this project, please take a moment to read the knitting abbreviations. We’ve shared a few important abbreviation details that you’ll need while working on the pattern. Make sure to check them so you can follow the instructions easily and enjoy a smooth knitting experience.
SL: Slip Stitch/Stitches
K: Knit
P: Purl
STS: Stitches/Stitch
RS: Right Side
WS: Wrong Side
SL2tog: Slip 2 stitches together
SSK: Slip Slip Knit
K2tog: Knit 2 stitches together
P2tog: Purl 2 stitches together
Step-by-Step Winter twisted Beanie Knitting Instructions Using Straight Needles
Cast on: 111 sts for Beanie with Vardhman Woolista Merino Wool Yarn/3.25 mm straight needle.
Sizes Available: The finished unisex twisted beanie measures approximately 9 inches in total length, consisting of a 1-inch brim, a 7-inch main body, and a 1-inch crown. Fits a head circumference of 22–23 inches (one size).
Skill Level: Intermediate/Beginner.
Pattern Language: English.
Techniques Used: Cast on 111 stitches and work the brim. Once the brim reaches the desired length, twist it according to the pattern below. Continue working the main body pattern until the beanie reaches the required length. Shape the crown, cut the yarn, and neatly sew the edges together to finish.
How to Knit the Brim for a Winter Twisted Beanie
Knit a 2×2 rib stitch border for the beanie. Follow the pattern below for the brim.
Row 1(RS): SL1(P), * K2, P2 * repeat from * to * …………… last 2 sts K1, P1
Repeat this row on both sides and work a total of 9 rows.
Row 10(WS): Purl all sts
Easy Twisted Stitch Pattern for Winter Beanie
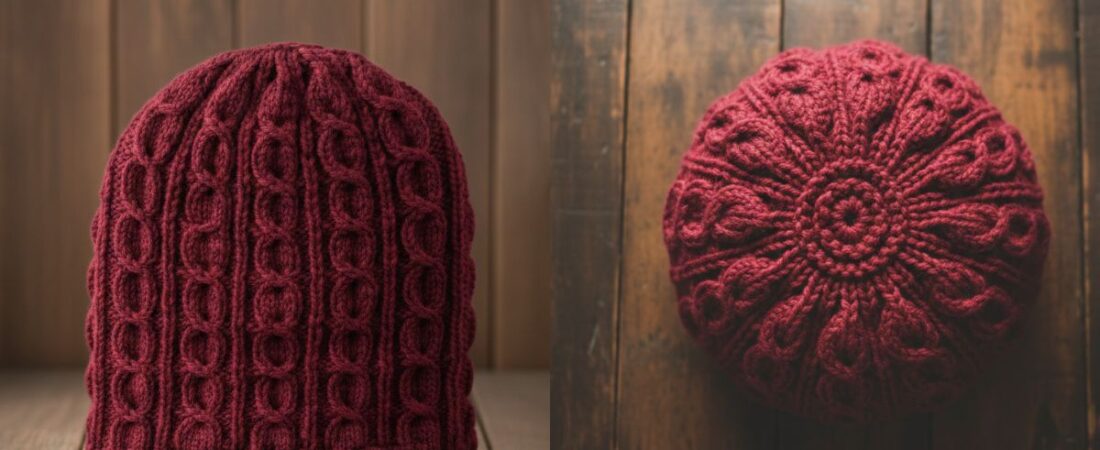
This part is very important for the beanie because the design you choose decides how beautiful and stylish the beanie looks. In this beanie, we have used a twisted pattern that is a little different. The design forms an oval shape with a thick line on both sides. The pattern below shows how the twisted design is adjusted in the beanie.
Row 1(RS): * P2, K1, P2, K5 * repeat from * to * …………. last sts P1
Row 2(WS): SL1(P), * P5, K2, P1, K2 * repeat from * to * …………………last 10 sts P5, K2, P1, K1, P1
Row 3(RS): Same as row 1
Row 4(WS): Same as row 2
Row 5(RS): Same as row 1
Row 6(WS): Same as row 2
Row 7(RS): * P2, K1, P2, take a sts onto cable needle & hold in front, take 3 sts onto another cable needle & hold behind work then K1, K3 from cable needle, K1 from first cable needle * repeat from * to* ………………. last sts P1
Row 8(WS): Same as row 2
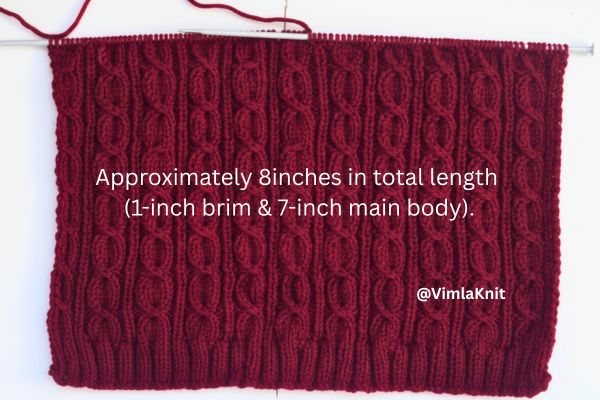
Repeat these 8 rows to complete the length of the cap. I have knitted a total length of 8 inches (1 inch brim + 7 inches pattern section). For this, I worked 7 full pattern repeats and 4 additional rows.
Note: If you have any questions or face any difficulty while knitting this winter twisted beanie pattern, feel free to comment below. We’ll do our best to share a video tutorial too.
Crown Shaping for Winter Twisted Beanie Knitting Pattern (Step by Step)
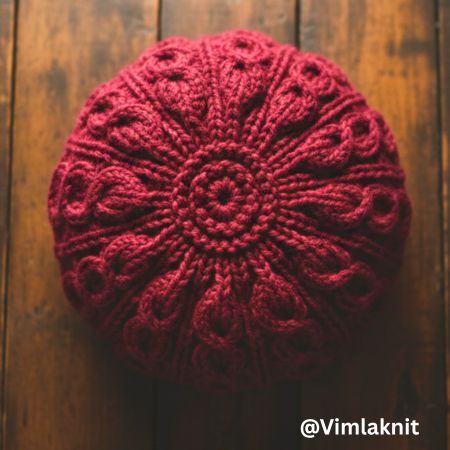
Now we will shape the crown. To give the beanie a perfect crown shape, please follow the pattern below.
Row 1(RS): * P2, K1, P2, SSK, K1, K2tog * repeat from * to * ………….. last sts P1
Now 89 stitches remaining.
Row 2(WS): SL1(P), * P3, K2, P1, K2 * repeat from * to * …………….. last 8 sts P3, K2, P1, K1, P1
Row 3(RS): * P2, K1, P2, SL2tog, K1, both slip sts over the knit sts * repeat from * to * …………….. last sts P1
Now 67 stitches remaining.
Row 4(WS): SL1(P), * P1, K2 * repeat from * to * ……… last 3 sts P1, K1, P1
Row 5(RS): * P2tog, K1 * repeat from * to * …………. last sts P1
Now 45 stitches remaining.
Row 6(WS): SL1(P), * P1, K1 * repeat from * to * …………….. last 2 sts P2
Row 7(RS): P2tog, P2tog, P2tog ……………… last sts P1
Now 23 stitches remaining.
Row 8(WS): Purl all sts
Row 9(RS): P2tog, P2tog, P2tog …………….. last sts P1
Now 12 stitches remaining.
Row 10(WS): Purl all sts
After decreasing the stitches, 12 stitches will remain. Thread these stitches onto a needle, pull them tight, and seam the beanie closed from both sides. Once sewn, the winter twisted beanie is ready to wear. If you have any trouble with seaming, feel free to leave a comment. I’ll try to share a video tutorial to help you.
Conclusion: Easy Winter twisted Beanie for Beginners
Let me know in the comments how you liked my winter twisted beanie knitting tutorial. I’ve shared more free beginner-friendly beanie projects on the blog, and you can try those too. If you like my beanie projects, please share this tutorial with others.
You can also share your knitting projects in our Facebook group, where knitters support and inspire each other. It’s a great place to show your work, ask questions, and connect with the community. Thank you for being a part of our knitting journey.
FAQs: Easy Twisted Beanie for Beginners
Can I use any weight yarn for this beanie?
Yes, but you must adjust needle size and stitch count according to the yarn weight.
Can I make this beanie larger or smaller?
Yes, adjust the cast-on stitches and knitting length to fit your head.
How do I shape the crown of the beanie?
Follow the step-by-step decrease rows in the pattern until 12 stitches remain. Then thread them onto a needle, pull tight, and sew the top closed.
Where can I share my finished beanie?
You can share your work in the blog’s comment section or in our Facebook knitting group, where other knitters support and inspire each other.
5 responses to “Free Winter Twisted Beanie Knitting Pattern for Beginners – Easy Unisex Hat Tutorial by Vimla Knit.”
-
Help please, ROW 7… I understand * P2, K1, P2, place these 5 stitches on cable needle & place in front, take the next 3 stitches and place on another cable needle and hold in back.
Then K 1 from your left knitting needle, K 3 from cable needle, K 1 from first cable needle…..
The number of stitches does not work out for me…. There is 1 remaining stitch that has not been worked…. Then do you slide the stitches from first cable needle to the right knitting needle?
I am unable to find a tutorial for this pattern.
Any assistance would be greatly appreciate.
Susan-
🔹 Step-by-Step Explanation
1: P2Purl the next 2 stitches.
2: K1
Knit the next 1 stitch.
3: P2
Purl the next 2 stitches.
4: Slip 1 stitch to cable needle & hold in front
Take the next 1 stitch off your left needle.
Put it onto a cable needle.
Hold this cable needle in front of your work (towards you).
👉 Don’t knit it yet.5: Slip 3 stitches to another cable needle & hold in back
Take the next 3 stitches off your left needle.
Put them on a second cable needle.
Hold this needle behind your work (away from you).
👉 Again, don’t knit them yet.Now you have:
• 1 stitch waiting in front
• 3 stitches waiting at the back6: K1 (from main needle)
Knit the next 1 stitch from your main left needle.
7: K3 from cable needle (the one held behind)
Take the cable needle that was held at the back.
Knit those 3 stitches from it.
8: K1 from first cable needle (the one held in front)
Now take the cable needle that was held in front.
Knit that 1 stitch.
That completes one full cable section ✨
Repeat everything between the * * across the row.
At the very end of the row:
🔹 Last stitch = P1
Purl the last stitch.
-
-
A really good blog and me back again.
-
Row 7(RS): * P2, K1, P2, take a sts onto (Just making you aware that there is a typo, in Row 7. It says take a sts, do you mean the? I am sorry to mention something so silly, it just can cause a little confusion.
I want to Thank You sincerely Vimla for such a beautiful pattern!
I am so excited to try this pattern. What gorgeous work! I am already thrilled to see what is coming next! Regarding knitting in the round? Are any modifications needed or should we simply follow everything the same? I can’t imagine that it would be the same? I could be wrong. I am planning on knitting this flat. I have not knit a hat flat forever.
Thank you again, with love from Canada!-
HI Veronica
🔹 Step-by-Step Explanation
1: P2Purl the next 2 stitches.
2: K1
Knit the next 1 stitch.
3: P2
Purl the next 2 stitches.
4: Slip 1 stitch to cable needle & hold in front
Take the next 1 stitch off your left needle.
Put it onto a cable needle.
Hold this cable needle in front of your work (towards you).
👉 Don’t knit it yet.5: Slip 3 stitches to another cable needle & hold in back
Take the next 3 stitches off your left needle.
Put them on a second cable needle.
Hold this needle behind your work (away from you).
👉 Again, don’t knit them yet.Now you have:
• 1 stitch waiting in front
• 3 stitches waiting at the back6: K1 (from main needle)
Knit the next 1 stitch from your main left needle.
7: K3 from cable needle (the one held behind)
Take the cable needle that was held at the back.
Knit those 3 stitches from it.
8: K1 from first cable needle (the one held in front)
Now take the cable needle that was held in front.
Knit that 1 stitch.
That completes one full cable section ✨
Repeat everything between the * * across the row.
At the very end of the row:
🔹 Last stitch = P1
Purl the last stitch.
Is this ok?
-
Leave a Reply to Susan Cancel reply